
A while ago, I posted an article about the giant crystal forests I made for Beyond the Gates of Antares. People asked a few questions about the grit I used on my Mars bases and the rock colors.
What are We Trying to Replicate
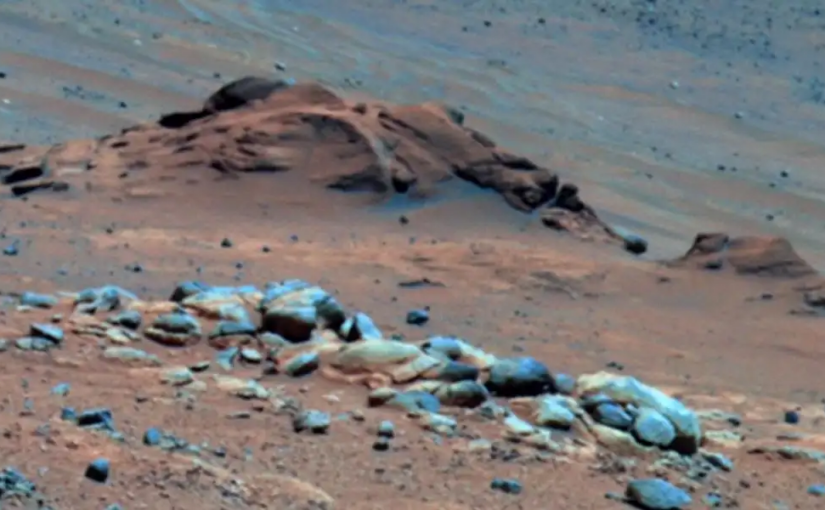
I want to replicate two different features common in Mars pictures. First is fine, red soil (called regolith) that seems to be everywhere. The red color comes from abundant iron oxide — yes, Mars is red because it is rusty. The second feature is the dark, polished rocks that seem to be abundant. I believe these are mostly basalt (cooled lava). The wind-blown soil wears down the one side and polishes it to an almost glossy sheen.
Making Martian Regolith
Materials
Fortunately, Woodland Scenics makes the perfect material for Martian regolith — iron ore ballast. That is the same material as the Martian soil. You will need all three grain sizes and a couple other colors for reasons I will explain later. Here is the materials list.
- Woodland Scenics Iron Ore Fine Ballast
- Woodland Scenics Iron Ore Medium Ballast
- Woodland Scenics Iron Ore Coarse Ballast
- Woodland Scenics Buff Medium Ballast
- Woodland Scenics Lump Coal
- Empty shaker
Early Experiments
My first thought for using the grit was to use mostly the coarse grit and use the fine grit to mark trails or other special things. That ended up looking terrible. There were too big issues. The first was that there wasn’t enough visual contrast between the grit sizes on the board, it all seemed to blend together. Additionally, the grit was too plain. One of those cases where even though the material was realistic, it didn’t look realistic.
I experiment for a while and discovered that mixing the grain sizes of iron oxide together was better. Then I tried mixing in some other colors of ballast and learned that small amounts of a lighter color (buff) an a darker color (coal) made it pop like I wanted.

The Formula
In your shaker mix the following colors, it seems to be better to mix the light and dark colors last.
- 1 part coarse iron oxide
- 2 parts medium iron oxide
- 1 part fine iron oxide
- Shake well to see if you have a decent mix of grains. Adjust if necessary.
- 1/4 part buff ballast
- 1/4 part lump coal
- Shake well and sprinkle onto some paper to see how it looks.
- Add very small amounts of buff and coal if necessary (it is much harder to add more iron oxide if you add too much buff/coal)
That is really all there is too it. Apply it however you would any other grit. I apply it over a brownish-gray substrate (Reaper Ashen Brown, see below). I do not paint this grit — it looks super as it is.

The Rocks
If you examine pictures of the wind swept rocks scattered around, you will notice a few features. They are all sloped more on the side of the prevailing winds. The are also glossy and tinged blue again on the side facing into the prevailing wind. This does not seem to apply to cliff faces or other forms of bedrock, just smaller rocks and boulders scattered around.
Materials
I use Reaper Paints, which I think is unusual in wargaming. If people want to post matching colors from other lines in the comments below that would be helpful.
- Rocks, these can be natural, cast from plaster or whatever. Try to find ones that have a more pronounced slope on one side.
- Dark primer, preferably black
- Reaper Dark Elf Shadow (09163)
- Reaper HD Ashen Brown (29831)
- Reaper Ashen Blue (09057)
- Matt coating
- Some sort of brushable, clear gloss coating. (I use Future Floor Wax, which is really gloss acrylic paint).
Making the Rocks
Note, that if you want rocks and regolith on the same piece, and you probably do, then you want to do the rocks first.
- Glue your rocks down paying attention to get the sloped sides facing the same direction. This is your windward side.
- Prime with your dark color and allow to dry
- Paint the entire rock with the dark elf shadow. Be sure to get in all the little nooks and crannies
- If you want, you could apply a thick black ink wash to darken the deep areas further.
- When that is dry, apply a heavy dry brush of the Ashen brown over the entire rock.
- You can paint the rest of the ground that you are going to cover with regolith that same ashen brown.
- Apply a moderate dry brush of the ashen blue only on the windward side. It totally looks like the wrong shade of blue — just trust me it will be fine.
- Apply your regolith between the rocks with PVA or whatever you normally use.
- When that is dry, apply your matt coat and any other sealer you want to use.
- Finally lightly dry brush the windward side with the gloss coating. The gloss coating is thin so do this carefully. Make a single light, pass on the windward side and let it dry. If it isn’t glossy enough, do another single, light pass and let it dry. If you brush back and forth like you usually do when dry brushing, the gloss will fill all the crevasses and ruin the effect.
- As a remind, do not apply any coating after dry brushing the gloss.
If you have any comments, suggestions or improvements, put them in the comments below.